This is definitely the truth in this case!! I picked up an old dresser out of a neighbors dumpster (with their permission of course!) I couldn't help myself- I saw the legs and could see its potential!! So I got this old dresser for FREE and also a nightstand for $1 at a yardsale . They both have been sitting in our old garage , then to the storage unit for lets say a year!! Their time finally came - to go from drab(a.k.a. garbage-as Adam calls it!!) to fab. So here are the pics and how they came to be.
BEFORE
Just look at those legs -that's what won me over!!
Yes that is paint, along with stickers and pictures scratched into the sides!!
Here's the good stuff!! The top was covered in nail polish, lipstick, and
anything else a teenager could possibly get on the top of a dresser( why Adam called it garbage!)
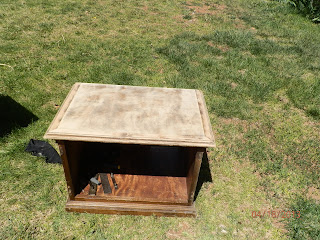
I sort of forgot to take a before of my $1 end table- this is all you get!!
Just picture it with doors and awesome hardware.
So now the process begins!! Lots of sanding ,much easier with my
ROBI power sander (you see in background) that I got for Valentines day -
best present ever!! Next day, more sanding - In my front yard of course for all to see!! Welcome to the neighborhood - yes we are the ones with the junky furniture in our front yard!! Once they were down to bare wood -they were beauties, in all their natural glory!
Next, I sprayed the end table with some Ivory spray paint I had left over from another project. Total spent so far $1!! I figured if I screwed it up, I wasn't out anything!! Sorry no pics of that. After it dryed (next day)
I then glazed the bottom with Martha Stewart pretinted glaze. This glaze is not my favorite, it didn't seem to cover well. If I did it again I would use Ralph Lauren tintable glaze. I've used it before and prefer it much better.
For the top I chose to stain it a dark brown called Jacobean by Minwax. This was my first attempt with regular stain, ( I've only used gel stain prior) so I was a bit nervous. I was surprised how easy it went on.
Then came the polyurethane- that's a different story-ha ha !! I first brushed it on, then could see the brush marks - so back to sanding we go!! Then I tried wiping it on like the stain, that was a BAD idea- it looked terrible!! Back to sanding we go (Hi Ho, Hi Ho!!) -actually back to
HomeDepot we go! Oh how we love the
HomeDepot -or so you would think since we are there every other day!! I found spray polyurethane (awww!) and convinced my sweet husband (the professional painter) to spray it for me.
At last, it was complete!! put the doors back on and the old hardware looked awesome!! So here it is after way longer than it should have taken !! My $15 (stain and spray poly) project!!
Taa Daa
So then I was super motivated to finish my dresser right?? Ya, not so much- it sat in the front yard for a couple days before getting the energy to start again!! At one point my sweet husband asked when the yard art was gonna be gone!!
Back to
HomeDepot for more paint, they don't have the same brand as the end table. So I got the color that I thought was the same in another brand DONT EVER DO THAT!! Especially if you plan to put them near each other . This color was Rustoleum Heirloom White.
I got it sprayed and glazed and then on to staining the top, I was moving right along until..... well this dresser doesn't have drawers(hence the dumpster) so my plans were to make it a bookshelf. It had wood cut out of the center of each shelf that I now needed to find something to fit. So off to you know,
HomeDepot I went to find -NOTHING in the size I needed (3/8 inch)!! So here's what she looked like at this point.
So we tried the other
HomeDepot with my husband intact to make sure it measured right. We found something that was gonna have to work- a plywood type beadboard sheet. We had it cut there (they will do that for you there- for FREE!) Super excited to go home and put it in, and get this project finished -3 weeks later (now moved into my half finished new garage) So they don't fit-not a single one!!
I tried sanding them down to fit and after hours of sanding that didn't work! So I made Adam teach me how to use his circular saw. ( I think its called!)
WOW!! That was amazing!! I know why they call them power tools!! You feel so powerful when you use them!! So I cut them and it was easy, and they fit at last!
I stained them the same as the top and they look great-heres a look:
Almost there- just needs a back, (didn't come with one ) I used the same bead board stuff as the shelves. I decided to paint it Heirloom white as well and glaze it, to tie it into the rest of the dresser.
Here is the final reveal:
I've started decorating, still more to go!
so here's the side by side
BEFORE AND AFTER


