Saturday, May 25, 2013

Spray Painting Light Fixtures

                   So to finish updating the bathroom, I chose to change out the silver and go with oil rubbed bronze.  With a very small budget to work with I decided to spray paint anything I could to save some bucks!! I did some research on were else but pinterest lol !! I found what I was looking for- how to spray paint metal without it scratching off.  Its on my my pinterest page under new house ideas( I don't know how to link directly to that pin!!).   The secret is spraying a clear coat over the color after it is dry!! Seriously I would have NEVER thought of that on my own- thank you Pinterest!!  So all my hours are not wasted- they were hard work that paid off! lol-that's what I 'll keep telling myself!! 
 
Here's the before -
Lights and outlet plates

 
The light fixture I painted, was actually donated from my friends husband.  It was silver just like the one that was in the bathroom, but it had the light covers with it.  I also sprayed the silver towel rack that I had with the same oil rubbed bronze paint.  My sweet little brother donated a brand new TP holder  and a hand towel rack that he had extra.  We bought the new faucet at walmart-who'd have guessed !! 
 
So far my cost is :
 
Cabinet redo- $0
New TP & hand towel rack (donated)-$0
New and Newly painted  light fixture (donated)-$12 paint and clear coat
New and Newly painted towel rack(craigslist)-$5
Outlet plates - $0
New Faucet -$65
New knobs on white cabinet-$4
New shower hooks -$6
New hanging basket for towels $20
 New Rug - $8
 
Total spent: $120
(doesn't include a new toilet and stuff to remove and redo grout on tub-that's another day of fun!!)
 
Here's the Reveal :


That's all for now!!
 
Still to do:
Frame mirror-I'll definitely post how that goes!!

Bathroom Cabinet Redo

                           The fun stuff we (mostly me) did in the bathroom were to redo the cupboards. 
                                                                  Here's a before:
 

                              Not a very good picture, but the color is builder grade oak
                                        ( you know the yellowish color ones)

            So I decided to make them darker using GelStain, I think its by Minwax.  This stuff is great because you DON'T have to sand down to bare wood!!! That means a lot less work-which means project done quicker, that's what I love!!  So you lightly sand then wipe on with an old sock and when it dries put a coat of poly on top and whala- it's like new cabinets!! But it only cost me-$0, since I already had the stain and the poly !! 
                                   
                                         Here's the after ( I wish the pictures were better- just believe me,               they look  100 times better !!)   It's like going from the 90's to the 2000's!!


                                                    BEFORE        AND             AFTER


 Ain't she a beauty?? I think so!!

Bathroom Overhaul

                  The upstairs bathroom - a work in progress!!  So here's the first room to see the transformation that has been done.  So remember when I said our house was really nice it just needed a lot of elbow grease, well - here is exactly what I meant. 

           When we bought our house we had 3 weeks of remodeling on our bedroom that took place before we moved in.  During that time, I spent pretty much all day every day scrubbing our new house.  I say scrubbing lightly!! So here are the before pictures of what took place.


                       So here's the tub area( majority of work took place here!)  So if you ever have the great idea that you should put clear silicone over your grout -PLEASE DON'T!! That is unless you would like to see the mildew growing under it, and have dark black gross around every corner of your bathroom. Oh wait that was our bathroom!!

                  So ya, around the entire tub, the corners of the wall on the tile, the floor next to the baseboards, around the toilet on the floor (everywhere) was covered  with clear silicone.  So that's were I began, I started with a razor then moved on to needle nose pliers and after days of working on removing the silicone(mildew intact)  someone at  my favorite store HomeDepot told me to try mineral spirits.  That helped but I still kept on with my razor and pliers, I even recruited my friends to come help ( I know they loved it!)  Finally it was done- no more silicone.   Only to discover the purpose of the silicone, cracked and braking grout!!

                     Now we have to remove the grout - we got a special tool at you know HomeDepot.   Me and Adam both got to work on that project - and the fun we had !!!  So 3 weeks later, we moved in and had no grout in our tub - that meant no showers upstairs.  It only took a couple weeks till we (Adam) put the grout in and we had a working bath/shower upstairs - HOORAY!! 


Monday, May 20, 2013

"One mans trash is another mans treasure!"

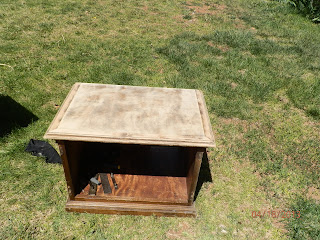
This is definitely the truth in this case!! I picked up an old dresser out of a neighbors dumpster (with their permission of course!)  I couldn't help myself- I saw the legs and could see its potential!!  So I got this old dresser for FREE and also a nightstand for $1 at a yardsale .  They both have been sitting in our old garage , then to the storage unit for lets say a year!!  Their time finally came - to go from drab(a.k.a. garbage-as Adam calls it!!) to fab.  So here are the pics and how they came to be.

                                                  BEFORE
                                      Just look at those legs -that's what won me over!!
                      Yes that is paint, along with stickers and pictures scratched into the sides!!
                      Here's the good stuff!!  The top was covered in nail polish, lipstick, and
anything else a teenager could possibly get on the top of a dresser( why Adam called it garbage!)


            I sort of forgot to take a before of my $1 end table- this is all you get!!
                      Just picture it with doors and awesome hardware.

         So  now the process begins!! Lots of sanding ,much easier with my ROBI power sander (you see in background) that I got for Valentines day -best present ever!!  Next day, more sanding - In my front yard of course for all to see!! Welcome to the neighborhood - yes we are the ones with the junky furniture in our front yard!!  Once they were down to bare wood -they were  beauties, in all their natural glory!

        Next, I sprayed the end table with some Ivory spray paint I had left over from another project. Total spent so far $1!!  I figured if I screwed it up, I wasn't out anything!!  Sorry no pics of that.  After it dryed (next day) 
        
          I then glazed the bottom with Martha Stewart pretinted glaze.  This glaze is not my favorite, it didn't seem to cover well.  If I did it again I would use Ralph Lauren tintable glaze.  I've used it before and prefer it much better.

         For the top I chose to stain it a dark brown called Jacobean by Minwax.  This was my first attempt with regular stain, ( I've only used gel stain prior) so I was a bit nervous.  I was surprised how easy it went on.
          
          Then came the polyurethane- that's  a different story-ha ha !!  I first brushed it on, then could see the brush marks - so back to sanding we go!! Then I tried wiping it on like the stain, that was a BAD idea- it looked terrible!! Back to sanding we go (Hi Ho, Hi Ho!!) -actually back to HomeDepot we go!  Oh how we love the HomeDepot -or so you would think since we are there every other day!!  I found spray polyurethane (awww!)  and convinced my sweet husband (the professional painter)  to spray it for me.

             At last, it was complete!! put the doors back on and the old hardware looked awesome!! So here it is  after way longer than it should have taken !! My $15  (stain and spray poly) project!!
                                                                    Taa Daa

           So then I was super motivated to finish my dresser right??  Ya, not so much- it sat in the front yard for a couple days before getting the energy to start again!!  At one point my sweet husband asked when the yard art was gonna be gone!!

         Back to HomeDepot for more paint, they don't have the same brand as the end table. So I got the color that I thought was the same in another brand DONT EVER DO THAT!! Especially if you plan to put them near each other .  This color was Rustoleum Heirloom White. 

        I got it sprayed and glazed and then on to staining the top, I was moving right along until.....  well this dresser doesn't have drawers(hence the dumpster) so my plans were to make it a bookshelf.  It had wood cut out of the center of each shelf that I now needed to find something to fit.  So off to you know, HomeDepot I went to find -NOTHING in the size I needed (3/8 inch)!!  So here's what she looked like at this point.

                         So we tried the other HomeDepot with my husband intact to make sure it measured right.  We found something that was gonna have to work- a plywood type beadboard sheet.  We had it cut there (they will do that for you there- for FREE!)  Super excited to go home and put it in, and get this project finished -3 weeks later (now moved into my half finished new garage)  So they don't fit-not a single one!! 

           I tried sanding them down to fit and after hours of sanding that didn't work!  So I made Adam teach me how to use his circular saw. ( I think its called!) WOW!!  That was amazing!! I know why they call them power tools!! You feel so powerful when you use them!!  So I cut them  and it was easy, and they fit at last! 

         I stained them the same as the top and they look great-heres a look:

Almost there- just needs a back, (didn't come with one )  I used the same bead board stuff as the shelves.  I decided to paint it Heirloom white as well and glaze it, to tie it into the rest of the dresser.
 
Here is the final reveal:
I've started decorating, still more to go!
 
so here's the side by side
 
BEFORE   AND    AFTER


Wednesday, May 15, 2013

Our New House- Before

So just as I promised here's a look at the inside of our new house.  Keep in mind- I'm not the best photographer in the world!  Hopefully you can get the  general idea of what it looked like.  I will break down each area we have been working on later and show what we did and didn't do.


That is the upstairs- which we were really lucky to have gotten a house in such good shape. We did not have to replace any flooring in the house -what a relief!! For the most part with some cleaning supplies and a little (ok, a lot)  elbow grease, it was livable.  We have been updating things as we have a chance -it is our weekend activity!!
 
Here's the Basement:


I know the 70's are rockin in this room!!


There you have it- the beginning of our new life in our new house!! We definitely scored on this house, we ended up with a lot of space inside and out.  The best part is where we ended up, I could not ask for nicer neighbors.  We are continually blown away how great everyone is that lives around us.  The fact that my kids have friends all around is amazing!! The other night, they were actually out playing night games with all the neighborhood kids.  It was just how I grew up, and that makes me sooo happy!!

Tuesday, May 14, 2013

Minnie Mouse Hair Bows

I know this blog is about house projects, but sorry I have a hair accessory project that needs posting!
I made these super cute Minnie mouse hair bows I saw on pinterest for Emma and my nieces for Disneyworld.  Since my sister asked me to email her a pic- I laughed at her because that is how technologically(is that a word?) challenged I am!! So now that I know how to post pics on this blog, I will post it here. 
                             Here you go girls-one for each of the cute little mousekateers!!

Here's lookin at you BAMBOO!!

So as I was trying to organize my pics on my new computer, I found the bamboo pics.
Here they are -I know you all are going to be jealous, and those of you who want starts -
 we still have some popping up (I hope one day it is all gone!)


Yes that is a toilet- if you were wondering!! We took it out of the basement bathroom-
 more on that later , that's an entire days post!!

OLD HOUSE- NEW HOUSE

I feel like I need to have one last look at our house of 11 years - and yes that is how long it took to replace pretty much every thing in the entire house before we sold it! So here is the final tour of our 1st house in Ivins.


                               We put brand new carpet in the bedrooms right before we sold it.


               I finally had my house just how I liked it- then we moved and I'm trying to make everything work in our new house.  It has been quite a challenge- most days I give up on trying!


                  Now for the reveal of our new house!  Just remember these are the before pics!!


                                 Notice there is no garage yet-doesn't work for our 5 plus vehicles!!
                Ain't she a peach- and I don't mean that because everything is kind of a peach color! I'll give you a quick look at the huge backyard - big reason we bought the house (there are not many houses on 1/3 acre here in St. George ).  I know that is not big for northern Utah (where I am from) but down here it just doesn't happen- unless you take a step back to the 70's!! That's just what we did-hence the peach color brick!  I hope I don't sound like I'm ungrateful, because I'm not- we have twice the space inside and outside as our last house!   We just have lots of work to do...again!!


             Yes that is a chicken coup-now gone, but it was hiding behind a 40 foot long wall of 25ft tall bamboo!  I thought I had a pic, but I cant find one.  If anyone out there thinks bamboo would be a great idea- let me highly suggest against it!! It is really hard to get rid of and that's besides the fact that it is super ugly!!  I'll start posting pics of the inside before shots maybe tomorrow.